waiterio를 사용하는 이유
수익 증대
빠른 서비스
더 나은 결정

무료 웹사이트 빌더를 사용하면 레스토랑을 위한 효율적인 웹사이트를 구축하고 온라인 주문 접수를 시작할 수 있습니다. 이제 온라인으로 고객을 유치하여 레스토랑 비즈니스를 성장시킬 수 있습니다. 이것은 당신의 매출을 크게 증가시킬 것입니다!

빠르고 효율적인 POS(Point of Sale) 시스템을 통해 레스토랑을 훨씬 쉽게 관리하고 고객에게 서비스를 제공할 수 있습니다. 주문 접수, 직원 관리, 송장 생성과 같은 시스템 레스토랑 운영이 시스템화됩니다. 이것은 레스토랑의 서비스 품질을 크게 향상시킵니다!

당사의 판매 시점 시스템은 귀하의 레스토랑에 대한 판매 보고서를 생성할 수 있습니다. 이것은 귀하의 비즈니스에 잘 맞는 것이 무엇인지 알게 되�므로 귀중한 비즈니스 통찰력을 제공할 것입니다. 더 나은 비즈니스 결정을 내리고 수익을 높일 수 있습니다!
간단한 4 단계로 레스토랑 주문 관리
Waiterio는 원활한 의사 소통으로 레스토랑 직원을한데 모으
레스토랑 POS 기능
강력한 POS 소프트웨어를 사용하면 식당 관리가 매우 간단해질 수 있습니다. Waiterio POS를 사용하여 손쉽게 레스토랑을 관리하는 방법은 다음과 같습니다.
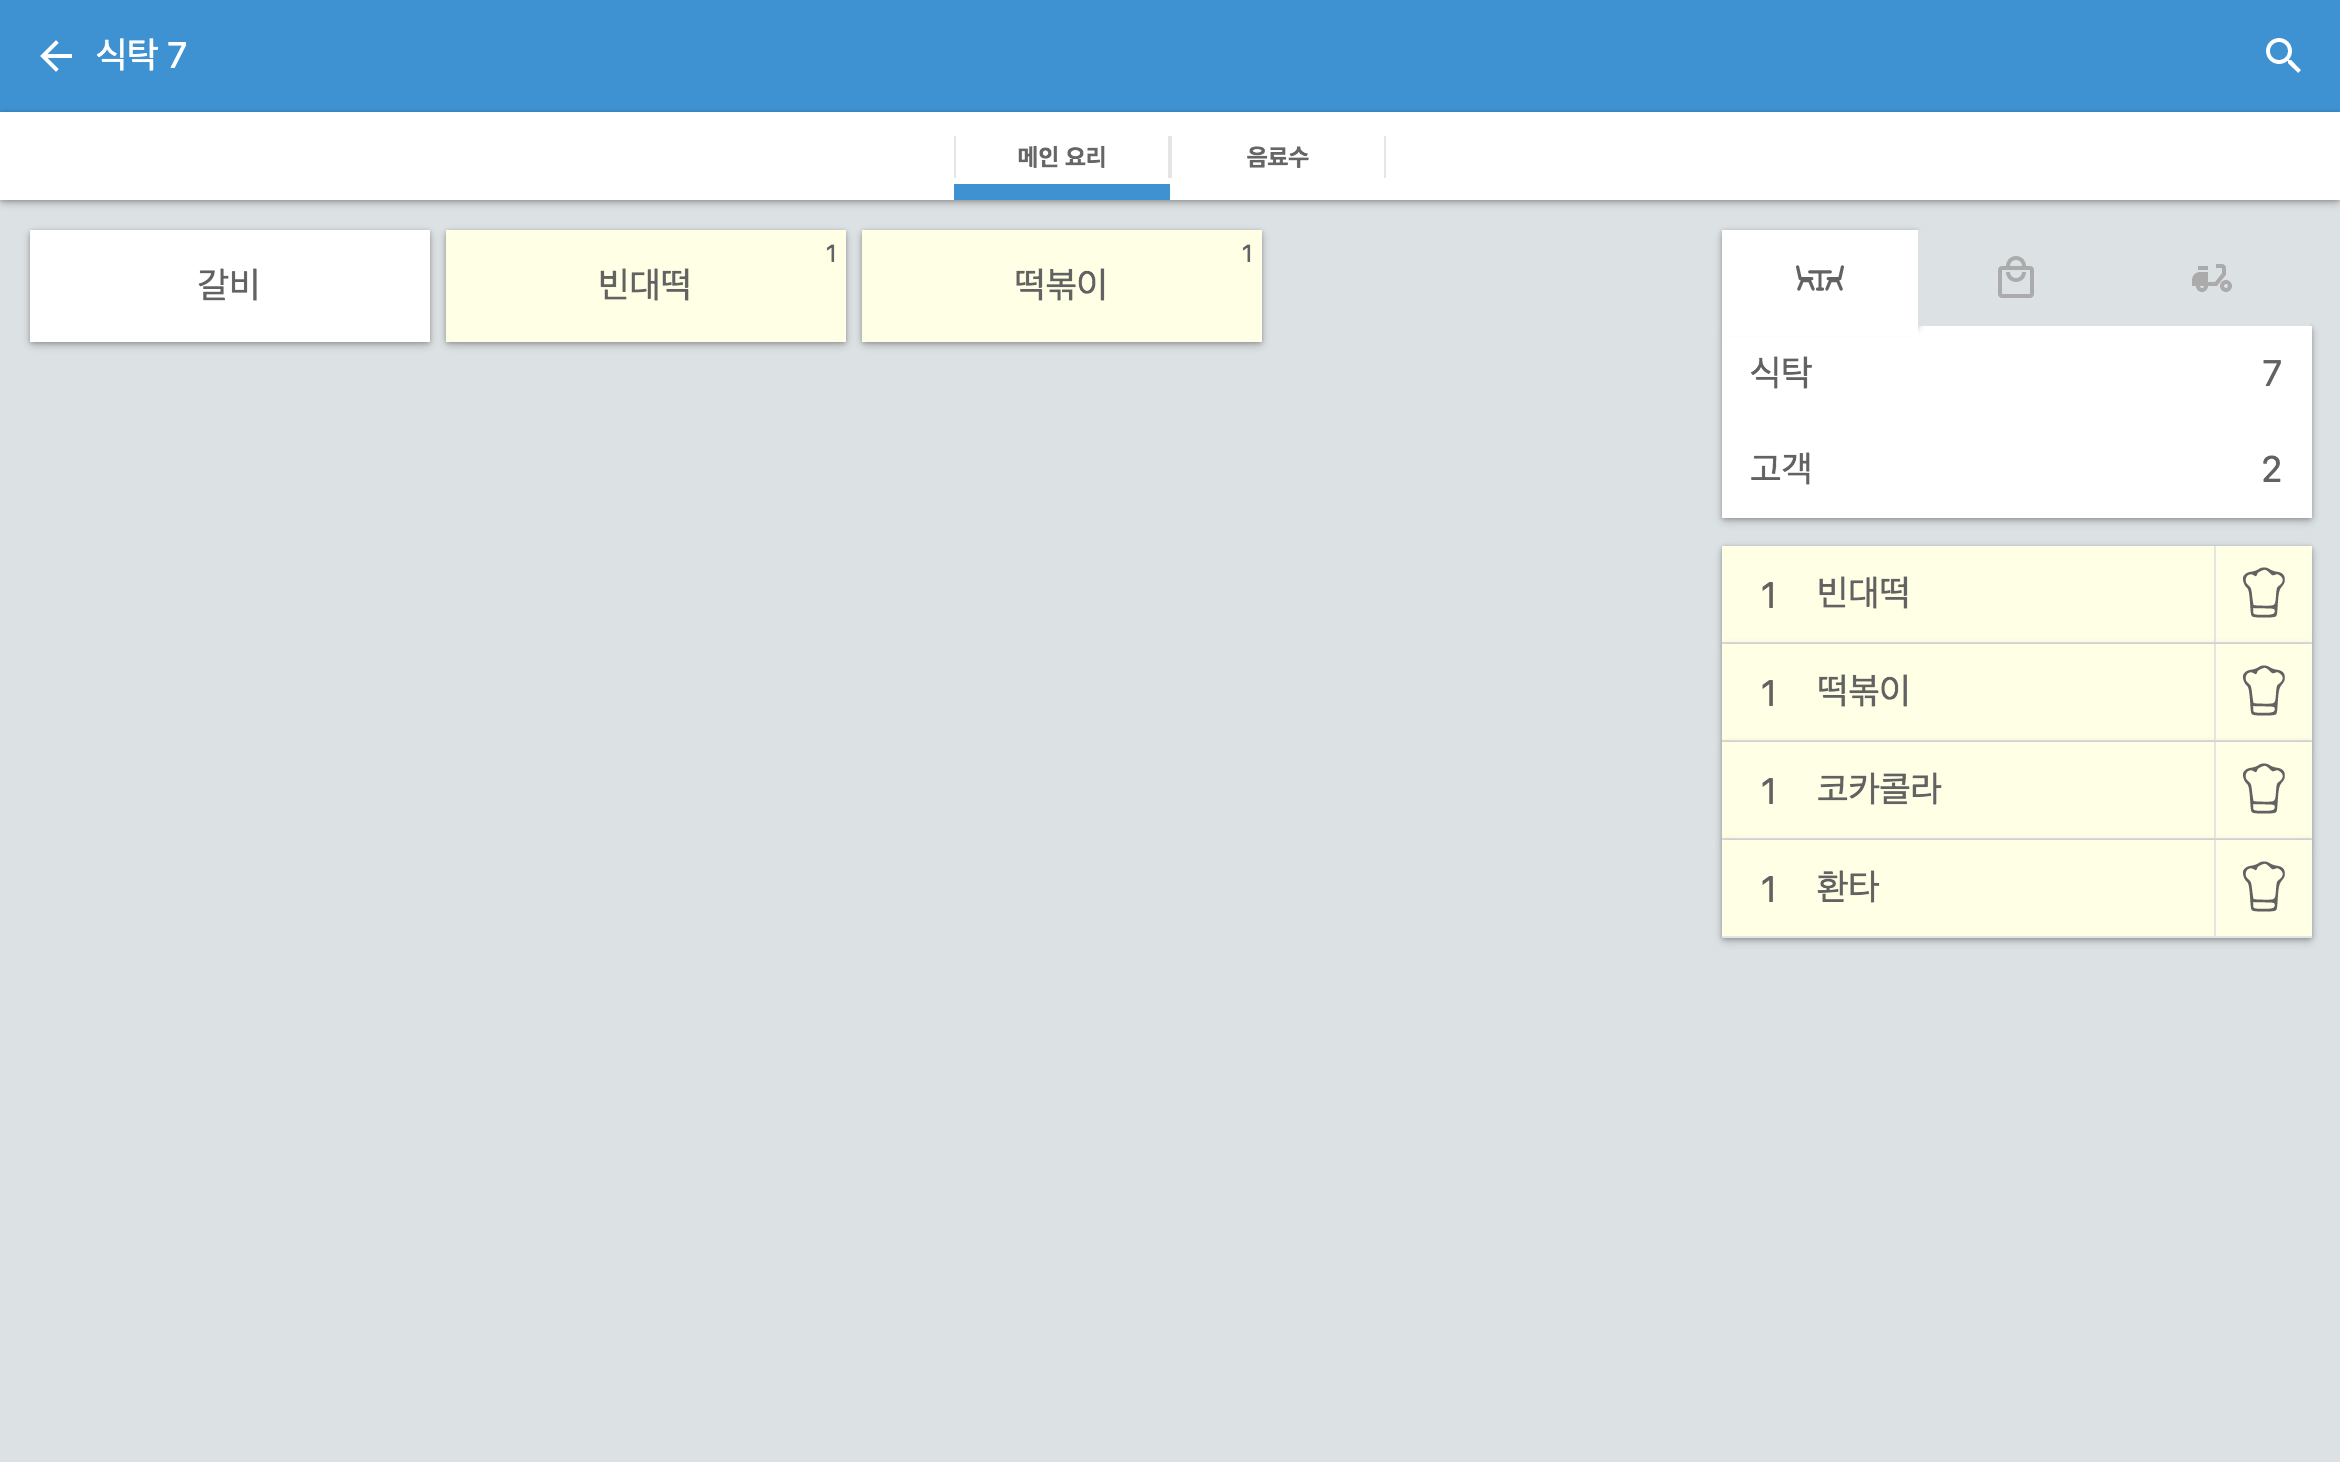
주문 관리
- 레스토랑 어디에서나 태블릿이나 스마트 폰으로 주문을받습니다.
- 주문은 주방 디스플레이 화면에 실시간으로 나타나며 프린터는 영수증을 자동으로 인쇄합니다.
- 레스토랑의 주문이 준비, 서비스 또는 지불되면 표시하십시오.
- 완료된 주문은 주방에서 혼동을 피하기 위해 표시되지 않습니다.
- 몇 초 만에 쉽게 주문을 업데이트하거나 취소 할 수 있습니다.


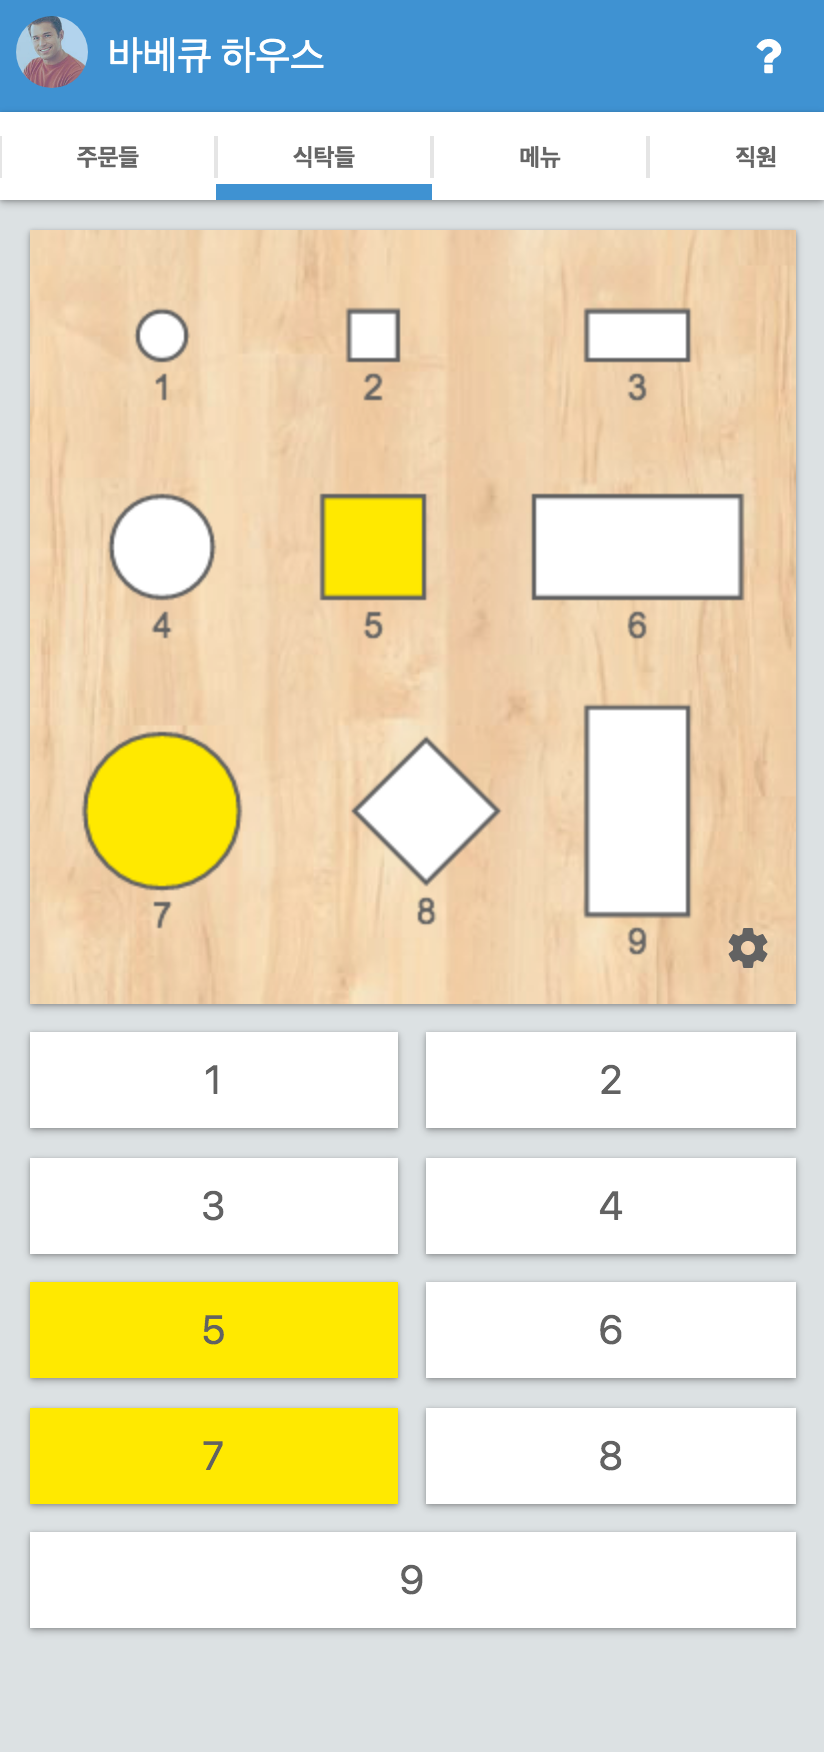
테이블 관리
- 다양한 모양, 크기의 표를 추가하여 레스토랑지도를 만들고 번호를 할당하세요.
- 레스토랑에 여러 개의 방, 다른 층 또는 야외 좌석 공간을 추가하십시오.
- 지도상의 표 또는 번호를 선택하여 직접 주문하십시오.
- 테이블 맵을 통해 레스토랑의 모든 주문에 대한 실시간 업데이트를 봅니다.
메뉴 관리
- 메뉴를 만들고 다양한 유형의 음식에 대한 카테고리를 추가합니다.
- 장치의 텍스트 파일에서 직접 전체 레스토랑 메뉴를 가져옵니다.
- 메뉴 항목에 사진을 추가하십시오. 고객을위한 사용자 정의 옵션을 추가 할 수도 있습니다.
- 재고가 없거나 사용할 수없는 경우 메뉴 항목을 숨 깁니다.
- 메뉴 카테고리와 항목을 쉽게 재정렬하십시오.
- 주방, 바 및 현금 카운터에 다른 프린터를 할당하십시오.


직원 관리
- 이메일 주소를 통해 직원을 쉽게 초대 할 수 있습니다.
- 각 직원에게 개별 역할을 할당합니다. 각 회원은 보안을 위해 레스토랑 소프트웨어에 제한적으로 액세스 할 수 있습니다.
- 주문을받는 동안 웨이터가 자동으로 테이블에 배정됩니다.
- 모든 직원에 대해 메뉴가 자동으로 동기화됩니다.
- 모든 직원은 레스토랑의 진행중인 모든 주문을 볼 수 있습니다.
결제 및 할인
- 동일한 청구서에 대해 다른 결제 방법을 선택하십시오.더 알아보기
- 고객에게 할인을 제공합니다. 고정 또는 백분율 할인을 제공 할 수 있습니다.
- 청구서에 세금을 자동으로 포함하거나 제외합니다.
- 고객이 별도 결제를 원할 때 별도의 청구서를 생성합니다.


판매 보고서
- 일별, 주별, 월별 판매량을 확인합니다. 사용자 지정 날짜 범위 사이에 판매 보고서를 가져올 수도 있습니다.
- 가장 많이 판매되는 메뉴 항목을 찾으십시오.
- 각 웨이터가 귀하의 레스토랑에 대해 얼마나 많은 수익을 창출했는지 알아보십시오.
- 모든 음식 주문에 대한 결제 방법, 날짜 등과 같은 자세한 정보를 확인하십시오.
- 장치에서 보고서를 다운로드하고 봅니다.
빠른 지원
- 문제가있는 경우 언제든지 친절한 지원 팀에 문의하십시오.
- 포괄적 인 자습서 및 설명서를 읽고 몇 분 만에자가 진단을 수행하십시오.
- Waiterio 앱을 통해 바로 기기에서 스크린 샷을 보내주세요.더 알아보기
- 모든 데이터는 클라우드 데이터베이스에 저장되므로 데이터 손실에 대해 걱정할 필요가 없습니다.

하드웨어
Waiterio는 모든 주요 운영 체제에서 작동하며 모든 열전 사 프린터를 지원합니다. POS 소프트웨어를 사용하기 위해 전용 하드웨어를 구입할 필요가 없습니다.
모든 장치
Waiterio는 태블릿, 스마트 폰, TV, 노트북 및 데스크톱 컴퓨터에서 사용할 수 있습니다. Waiterio는 Android, iOS, Windows, macOS 및 Linux와 같은 모든 운영 체제에서 작동합니다.


모든 프린터
Waiterio는 모든 열전 사 프린터를 지원합니다. 많은 회사가 고가의 하드웨어를 구매하도록하는 브랜드를 한두 개만 지원합니다.


모든 결제 방법 수락
결제를 수락하는 여러 결제 방법을 제공하여 고객에게 더 많은 유연성을 제공합니다.

신용 카드 처리
신용 카드 처리기를 사용하여 카드 결제를 수락하십시오.

바우처
충성도 높은 고객에게 제공하는 바우처를 통해 지불을 수락하십시오.

현금
현금을 통해 지불을받는 가장 전통적이고 일반적인 방법을 사용하십시오.
온라인 주문
사람들은 온라인으로 음식을 주문하는 것을 좋아하고 우리는 음식을 제공하는 것을 좋아합니다. 통합 POS 및 온라인 주문 시스템을 사용하면 귀하와 귀하의 고객이 이 프로세스를 쉽게 수행할 수 있습니다.
더 알아보기
자주 묻는 질문
Install the app for Android, iOS, Windows or macOS.
A) Find out the IP address of your thermal printer
- Turn off the printer
- Connect the printer to the electricity and connect an Ethernet cable from the printer to your wifi router
- Press down the Feed button and keep it pressed, then turn on the printer while still pressing the Feed button. After 5 seconds the printer should print a paper with written its current settings
- Read the setting paper and find the IP address. The IP address should look like 192.168.y.x
Your wifi router has two IP address:
질문의 나머지 부분을 읽으십시오
- Open Waiterio app and login
- Scroll right to switch to the STAFF tab
- Tap the button INVITE STAFF MEMBER
- Enter the email that your co-worker will use to login in Waiterio
- Enter the role you want him/her to be granted
- Tap the Invite button
- Your co-worker should receive an invitation email
- The co-worker needs to Sign Up to Waiterio using the same email you used to invite him/her
It is not currently possible to add new content such as creating a new Order in offline mode.
We do think that the possibility to add new orders in offline mode would be nice.
Unfortunately it is technically very difficult to achieve and we prefer to focus our limited resources into adding and updating more essential features.
We suggest you to get a fast DSL connection and a good wifi router to solve the No Internet Connection warnings.
You can also use a 3G/4G mobile data connection with a sim card on each device or shared through a portable wifi router.
Connection Interfaces
Each thermal printer has one or more types of connection interfaces:- Wifi
- Ethernet cable
- USB
- Bluetooth (NOT RECOMMENDED)
- Parallel (NOT SUPPORTED)
- Serial (NOT SUPPORTED)
Avoid Bluetooth thermal printers
Blueooth thermal printers should be avoided. Bluetooth thermal printers are cheaper but lose connection very easily. Bluetooth thermal printers are not supported on iOS and many times don't work on either operative systems as well.Buying online
We recommend to purchase thermal printers on Amazon. The same printer model can have different types of connectivity so it's necessary to check on each ad description the connectivity interface of that specific product sold. It's better to search for "Wifi thermal printer" than by thermal printer model.질문의 나머지 부분을 읽으십시오
- Open Waiterio app and login
- Scroll right until you reach the RESTAURANT tab
- Tap on Subscription
- You will see all available plans for your currency
- You can subscribe/cancel/upgrade/downgrade to a plan by clicking on the green/red button shown at the bottom of each plan
How are orders per month counted:
Each plan allows a certain a mount of orders per month. Only one order is counted for each table served. In other words, if you add items to an existing order it will NOT INCREASE the orders count.질문의 나머지 부분을 읽으십시오
- Download the latest version of Waiterio: Download for Windows Download for Mac OS X
- Install, open and login into the Waiterio application
- Navigate to the PRINTING tab and click on the button ADD PRINTER
- Set the protocol field to ESC POS
- Set the connection field to usb
- Input a name for your printer
- Click on the SAVE button
- Click on the new printer that just appear in the PRINTING tab
- Be sure your printer is turned on and connected to your computer with the USB cable
- Click on the button PRINT SAMPLE
- If the print fails, follow the additional steps below:
Extra steps on Windows
On Windows you will also need to install the WinUSB driver by following these steps:질문의 나머지 부분을 읽으십시오
- Open Waiterio app and login
- Scroll right to switch to the MENU tab
- Tap on the item Margherita
- Tap on the option 'Add new extra' from the popup menu
- Enter the name of the extra/topping
- Enter the price of the extra/topping. You can enter 0 for free extra/topping.
- Tap on the button SAVE
- Now you will able to use that extra/topping in any new order
You can add an extra/topping to an entire category of the menu.
You will be able to add that extra/topping to any item of that category in any new order.You can add extras/toppings that are already part of the menu in any new order
For example, if you have added an extra/topping Olives to an item named Margherita, you can follow these steps to use the extra/topping in a new order:질문의 나머지 부분을 읽으십시오
Install the app for Android, iOS, Windows or macOS.
Adhoc Wifi or setup application on the CD?
Some Wifi thermal printer create an adhoc wifi network that you can use to provide them with the SSID and password of your wifi hotspot router. Some other Wifi thermal printer must be configured with an application that was available on the CD that came with the printer.
Follow these steps to find out if your Wifi thermal printer can be setup using ad adhoc wifi network or using an program from the CD:
질문의 나머지 부분을 읽으십시오
- Open Waiterio app and login
- Navigate to the TABLES tab
- Click on the gear icon that appear on the bottom right corner of the map of the tables
- Click on the gear icon that appear on the bottom right corner just below the drawings of the tables
- You should be now in the Map screen where you will be able to add tables.
- Navigate to the Map screen as described in the previous steps of this guide.
- Click on the gear icon that appear on the bottom right corner just below the drawings of the tables in the Map screen
- Click on Add new table in the popup menu.
- The new table will be added on the top right corner
- Read the next point to find out how to change the appearance of the new table
질문의 나머지 부분을 읽으십시오
- Open the Waiterio app and login
- Create a new order with some items
- Navigate to the ORDERS tab
- Click on the icon that looks like 3 vertical dots on the top right corner of the order you created and choose Payment from the popup menu
NOTE: Users with roles ADMIN, OWNER, MANAGER and CASHIER should see a button PAY on each order that allows them to navigate faster to the Payment screen - You should be now in the Payment screen
- Click on the icon on the top right corner that looks like a percentage % sign on an arrow pointing down
- You can give a percentage discount (ex 10%) or a fixed discount (ex 5$).
- Open Waiterio app and login
- Navigate to the Website tab and click on "Self Order With QR Code"
- Click on "Download QR Codes", this will download a .pdf file that contains the QR Codes of all the tables in your restaurant
- After downloading the .pdf file, you need to print it using an inkjet printer on an A4 size sticky paper. You can buy sticky paper online by googling "buy A4 sticky paper"
- Follow the outlines and cut out the QR code stickers. The printed page contains the room and the table information along with the QR code. The table label at the bottom of each QR Code tells you which table the QR Code represents.
질문의 나머지 부분을 읽으십시오
A) Pairing
First of all you are going to need to pair your smartphone or tablet to the bluetooth thermal printer.
- Turn on your bluetooth thermal printer
- Open the Settings app on your smartphone or tablet
- Click on Bluetooth
- Turn ON the bluetooth
- Your smartphone/tablet will scan for nearby bluetooth devices
- Click on the name of your bluetooth thermal printer to start the Pairing
- Your bluetooth thermal printer should now be listed under Paired devices
질문의 나머지 부분을 읽으십시오
- Open Waiterio app and login
- Navigate to the REPORT tab. Only users with ADMIN, OWNER or MANAGER roles can view the REPORT tab
- Select a period of time like Today, Yesterday, This Week, This Month
- Click on the button Export .csv. On a smartphone this button may appear as a download icon drawn as an arrow pointing down.
- Save the .csv file on your device.
- Open the .csv file with a spreadsheet application like Microsoft Excel or Numbers On Microsoft Excel follow these extra steps:
- Select column A
- Click to the Data tab
- Click on Text to columns or Convert data
- Select Delimited and click on Next
- Select Comma and click on ‘Next
- Click on Finish
- Open Waiterio app and login
- Navigate to the ACCOUNT tab
- Click on the Logout button
- Log back in the app
- If during the login you are asked to choose a restaurant then your user is part of multiple restaurants. You will have to pay extra attention to login in the very same restaurant on all your smartphones/tablets/computers where you are using Waiterio
- Repeat the step above for ALL the devices of your restaurant.
질문의 나머지 부분을 읽으십시오
- two or more customers wish to pay only a part of the bill
- a customer wish to pay the bill with two different payments methods (cash and credit card)
- Open the Waiterio app and login
- Create a new order with some items
- Navigate to the ORDERS tab
- Click on the icon that looks like 3 vertical dots on the top right corner of the order you created and choose Payment from the popup menu
NOTE: Users with roles ADMIN, OWNER, MANAGER and CASHIER should see a button PAY on each order that allows them to navigate faster to the Payment screen - You should be now in the Payment screen
- Click on any item of the order to select it
- Selected items should be yellow with a ✓ icon on their left
- Click on the green button Pay to continue
- Choose a the payment method from the horizontal bar (ex. Cash) and click on the green button PAID WITH CASH
- You will see the items you selected appear now as Paid in the Payment screen
- Repeat the previous steps to select other items and receive partial payments
질문의 나머지 부분을 읽으십시오
- Navigate to the restaurant tab and scroll down until the section Online and POS payments.
- Click on the legal entity button and enter your business information as either a company or an individual.
- From the restaurant tab click on the bank account button to provide the checking account coordinates where you wish to receive the payouts for the card payments.
- Google Pixel 2 and newer
- Samsung Galaxy A12 and newer
- Samsung Galaxy S10 and newer
- Samsung Note 10 and newer
- Oppo Reno5 and newer
- Oppo Find X3 and newer
- OnePlus 6 and newer
- Xiaomi Redmi 9 and newer
- Xiaomi Poco X4 and newer
질문의 나머지 부분을 읽으십시오
waiterio POS 시스템을 사용하는 레스토랑
Waiterio는 레스토랑이 비즈니스를 성장시킬 수 있도록 가능한 최고의 서비스를 제공하기 위해 노력합니다.
최고의 레스토랑을 만나보세요.